Kucha
Polish Sweet Bread
Kucha is a polish sweet bread that has been on my Mom's side of the family for many generations. It is pronounced, "Cuha" and it became our family's traditional holiday breakfast bread for Easter, Thanksgiving and Christmas mornings. The crumbs to this bread are many people's favorite part, and I have to agree, they are delicious!
I remember hearing stories of my great grandmother teaching my grandmother when she got married, then my grandmother making it, then my Mom and yesterday I ventured into the unknown territory! I had always wanted to make the bread, but since we live so close to my parents we always were gifted a loaf on the holidays by my Mom to enjoy with our own family the morning we would wake. This Easter, Jeremy's family is coming to celebrate with us, so it was time to make my own batch. The day has to be set aside when making Kucha, since it becomes a 5 hour process between prep, rising and baking- but trust me, if you invest the time you won't regret it! In fact, this morning when we woke, I could still smell the bread in the kitchen making it very difficult to resist them until Easter morning!
This recipe makes 4 loaves of bread- it is perfect for sharing with family and friends and still enjoying on your holiday morning.
Want to know how we did it?? To ensure that my boys had a clear way to follow the recipe in the future, I photographed EVERY step to lessen confusion. So pardon the mass pictures, as they should be helpful in trying to recreate the recipe.
Here we go! Start by prepping- grind one lemon to retain the rind for a lemon zest.
Then set aside 5 eggs about 30 minutes before hand to ensure the eggs are at room temperature.
Get your yeast ready ...
and set aside the following ingredients for your dough preparation:
2 sticks butter
2 c milk
1 c sugar
2 tsp yeast
1/2 tsp mace
1/2 tsp cinnamon
1 tsp vanilla
1 1/2 c golden raisins (optional)
Heat 2 c milk on very low temperature. When warm take out 1/4 c of the milk and set aside in a small bowl. Add 2 sticks of butter to the remaining milk in saucepan, add the lid and turn off the heat. Let the butter melt.
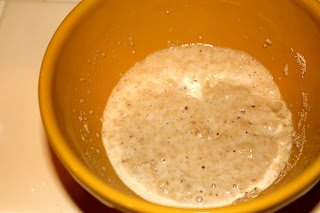
In the bowl with the 1/4 c milk, add a pinch of sugar and 2 tsp yeast ...
... stir gently and let it rise.
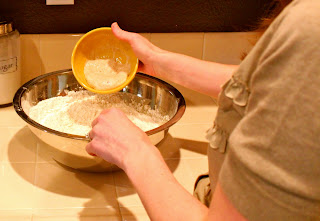
Put all the flour (7 cups) in a large bowl, add the lemon rind as well as the mace and cinnamon.
Gather your 5 eggs ...
Crack them ...
and set aside.
Before moving on with your eggs, check on your yeast to make sure it is becoming activated.
Now, beat all 5 eggs with the sugar and vanilla until it has a lemony coloring.
Slowly add the egg mixture to the flour mixture ...
then the yeast mixture ...
and finally the melted butter and milk mixture from the stove top.
I love seeing my Mom's hands working with my boys' hands, so sweet!
Use a wooden spoon to mix together. If you want to add golden raisins, add them at this time.
When it is completely mixed, beat the dough with your hand until it comes off of your hand quickly. My mom showed Cole how to do this.
This was my favorite part when I was little! My brother, sister and I would all take turns slapping the dough- Cole started and got weirded out by the texture on his hands ...
Braydon gave it a try and then started to eat the dough on his hands, so I took over. When the dough pulls from your hand, it is done.
Scrape the dough from the sides of the bowl.
Take a piece of wax paper and cover the bowl ...
then place a towel over the wax paper and place in the oven that has been warmed for 3 hours, allowing the dough to rise.
While the dough is rising, begin making the crumbs.
On medium/low heat, melt 2 sticks butter in a deep fry pan.
While I made the crumbs, my Mom and the boys watched the Velveteen Rabbit- I love how they all cuddle up close to each other!
Back to the crumbs- In a small bowl, mix together 2 3/4 c flour and 1 1/4 c sugar.
When the butter is completely melted in the pan, pour the flour and sugar into the pan and using a wooden spoon, slowly stir it all together.
When your crumbs resemble this texture, you are done. Turn the stove off and let the crumbs cool- while eating some of course!
Considering we had a few hours while the dough had to rise, we decided to cover our crumbs for later and head out for a donut run for the boys ...
and a much need coffee run for Mommy and Grammie!
Sweet Braydon fell asleep on the way home,
so when we came home we set up a picnic to Cole's request where Grammie, Mommy and Cole sat around on a blanket in our family room and had lunch together.
We checked on our dough and it was ready!
See how much the dough had risen??
Cole and I separated the dough into four sections, for our four loaves .... we admit, we played a little with the dough!
Spray your 4 loaf pans with a non-stick spray and fill the pans with the dough.
Beat up 1 egg and brush the egg over the top of the dough ...
... Cole was so patient and helpful, but I think he was getting a bit tired at this point!
Now that our egg has been brushed onto our dough, it is time to add the crumbs.
CRUMBS!
Take a large spoon to top the dough with the crumbs ...
evenly distributing them amongst each loaf.
Gently pat the crumbs into the egg topped dough to help the crumbs to stick,
but be careful not to press down too hard because the dough with not bake as high, as the rising element will be patted out.
Let the loaves rise again for about an hour, covering them with a towel and let them sit on top of your counter, untouched.
After the hour, you should notice that the dough and crumbs have risen again, measuring to the brim of your loaf pans.
Preheat your oven to 350 degrees. While I got started on some dishes, Grammie and the boys played trains.
Once the oven is ready, gently place all 4 loaves in to bake for 30 minutes. Place a piece of foil under the pans to catch the crumbs that may fall while baking.
After 30 minutes you will find this delicious bread waiting for you!
Let the bread cool for about 15 minutes before removing from the pans.
After the loaves have cooled about an hour out of their pans, cover to keep them fresh, or enjoy!
I am so blessed to have had yesterday's baking time with my Mom. I am so grateful to have learned our family's tradition and to have also shared it with both her and my own boys! What a special time for us all- continuing our tradition with another generation!


Oh oh...I started making this when I realized you forgot to say how much flour you use. :(
ReplyDeleteShe does mention it, 7 cups 😉
DeleteSo sorry! It is 7 cups of flour
ReplyDeleteToo much commentary about mom and kids, etc. Just provide recipe and instructions. UGH!!
ReplyDeletego look for another recipe, I thought the commentary was sweet.
DeleteI was just thinking what a sweet family you have. I enjoyed reading your story and appreciated the pictures. It was a delight. The recipe looks wonderful too. Thank you for sharing!
DeleteI ran across your sweet bread recipe and was so happy. It’s exactly as I remember my aunt’s recipe that I lost in our move. I hadn’t made it in years but after finding yours I’ve made it several times. It was delicious. Thanks for sharing!
ReplyDeleteThis is really sweet way to spend time with your boys and recipe looks yummy! I love the story told along with the recipe, thanks for sharing. BTW, your mom looks like your sister!
ReplyDeleteWhat a wonderful way to share the tradition and ensuring it continues, congratulations 🎈 on a job well done. I’m going to have to save and make this one!! Thank you 🙏
ReplyDeleteI so enjoyed reading the whole account. Reminded me of every Monday spent with my daughter and three grandchildren. A lot of baking with the kids sitting on the counter helping me(Gigi).
ReplyDeleteAs far as Miss Grumpy Britches not wanting to read the whole account, to you I say, go buy a recipe book. This is what blogs are all about. I can’t wait to try this recipe. Maybe I’ll wait until my grandkids visit next.
I loved the story and commentary given. It made me smile when I was reading it. I have many grandchildren and would love to make this with them. Thank you for sharing your pictures and wonderful day with us. I can't wait to try this. My husbands family is polish and I will make this for his mother.
ReplyDeleteI would really like this recipe without having to hunt through the dialog. Do you have it in a printable or copyable format? Thanks
ReplyDeleteThank you for this special post. Part of my heritage is Polish and this recipie is new to me. i am going to try it soon. Sandy
ReplyDeleteWhere is the recipe, no way can I make this by scrolling all the time
ReplyDeleteI have a recipe that was given to my mom, from my Uncles Wife Mother Busia, but I cant find it, amongst all the saved recipes. Im going to try this for Easter.
ReplyDeleteQuestion, how do you grind a lemon, not a food processor? The only grinder I’ve ever used was my mom’s Salad Master, I don’t want to buy a new set of stainless to get one. Hah! I love the family pictures and story, it’s so sweet. Good job, mom!
ReplyDelete