Tuesday, September 27, 2011

Quick Fried Chicken


Quick Fried Chicken

My husband loves fried chicken.  Frying food isn't something that I have done beyond a one time experience when I borrowed my sister's deep fryer.  I didn't have a deep fryer last night, but still wanted to surprise Jeremy when he came home from work with a dinner he would never expect.  This recipe was amazing- great flavor and it allowed for leftovers for today's lunch.

In a 9x13 dish mix together a quart of buttermilk and 2 tbsp tabasco sauce.  I used chicken breast, not chicken on the bone so I placed 4 pieces of chicken in the buttermilk to begin marinating.  Jeremy likes everything hot and spicy so I sprinkled some red pepper flakes on top of the chicken as well.  If you are short on time you can simply leave it for about 10 minutes, but the longer it marinates, the better it will taste.  I covered my dish and placed it in the refrigerator for the afternoon.


While the chicken was marinating I made some corn bread to later enjoy with dinner 
(recipe in a different blog to avoid recipe redundancy. Search the blog for corn bread) 


About 40 minutes before you would like to eat, begin preparing a plastic bag and fill it with 1 c flour, a dash of salt, 1/2 tsp pepper and 1 tsp cayenne pepper.  

At this time place a large skillet on the stove and fill it with oil.  Use enough oil so that it fills the depth of the pan about 2 inches deep.  It needs to be this deep to fully cook the chicken as it is submerged.  Begin heating the oil on high heat.

Remove the chicken from the buttermilk marinade and place in the plastic bag.  Shake the chicken around to evenly coat it with the flour mixture.  Repeat with all pieces of chicken.

Once chicken is coated, check the oil to see if it is slightly bubbling.  If it is, the oil is hot enough.  CAREFULLY place each piece of chicken in the oil, and lower the heat a bit. Do not touch the chicken for 15 minutes to allow it to fry. 


After 15 minutes, turn the chicken over to ensure it is cooked well for another 15-20 minutes.  The oil should continue to bubble.

Remove to a cooling rack to allow any remaining oil to drain.  


Serve with your favorite sides and save leftovers for lunch the next day!


*When cleaning up- DO NOT pour the remaining oil from your pan down your drain, it will harden and become a huge plumbing nightmare!!  Once the oil has cooled, pour into a can or bottle and seal it to throw away.  


Oatmeal Chocolate Chip Cookies

Oatmeal Chocolate Chip Cookies

Yesterday was the first day in a LONG time that the boys and I were home by ourselves- no one came to visit or play.  Daddy was at work and we had all day to play ... well, the boys had all day to play and I had high hopes to catch up on some cleaning and laundry.  While some of that got done, I wanted to be in the kitchen more!  The boys asked if we could make something, so who am I to argue?? :)

Starting with cookies, we ended up in the kitchen all afternoon as well ... one idea became another as you will see in a few other blogs to follow.

Chocolate chip cookies are my typical go to recipe, but today we did something different.  Preheat the oven to 375 degrees and prepare a few baking sheets.

In a small bowl, mix together 1 1/2 c flour, 1 1/2 tsp salt and 1 tsp baking soda.

In a large bowl, beat together 1 c butter or margarine, 3/4 c sugar, 3/4 c brown sugar, 2 eggs, 1/2 tsp vanilla and 1/2 tsp water.  

Add the flour mixture and stir well.   Mix in 2 c of oats and chocolate chips to your liking.  As you can see, Braydon snagged a few pieces of chocolate.


Mix all together.


Drop by teaspoonfuls onto a baking sheet.


Bake for 10 minutes.  Braydon likes to stand by the oven and watch them bake.


When golden brown remove from the oven and let cool.


In classic Cole fashion, he enjoyed his cookie with chocolate on his face, love it!  


Monday, September 26, 2011

Vegetable Lentil Soup with Homemade Garlic Croutons

Vegetable Lentil Soup with Homemade Garlic Croutons

I grew up eating lentil soup and forever it will be a comfort food to me.  After talking with my Mom, we shared our recipes to find many similarities between our two renditions- the biggest difference was the one I grew up with used potatoes, this recipe uses tomatoes.  Both are super tasty.  If you are looking for a thicker consistency, use potatoes- if you want more of a broth, go with tomatoes.  

Our Sunday was relaxing and homebound so I found myself in our kitchen.  I love smelling soup cook throughout the afternoon, but as it does my appetite grows with the hour as well!  

Heat a large soup pot over high heat and swirl in olive oil to coat the bottom of the pan.  Add 1 chopped onion, 2 peeled and chopped carrots, 2 celery stalks also peeled and chopped with 1 tbsp of chopped garlic.  If you are looking for a quick way to avoid chopping veggies, Trader Joe's mirepoix blend is awesome.  It has the onion, celery and carrots in one container to just add all together.  Reduce your heat to low and saute until the vegetables lightly caramelize.  Add 1 small chopped tomato.


Stir well incorporating the vegetables.


While the vegetables continue to cook, I prepared my baguette for my croutons.


At this time, add 1 6 ounce can of tomato paste and let it cook for a few more minutes.


As the vegetables thicken with the tomato paste I sliced my baguette into small cubes and placed them in a bowl for later.


Scoop 2 cups of lentils.


Add the lentils, 1 tsp dried thyme, a bay leaf (be sure to remove before serving), 1/2 tsp pepper and a dash of salt.


Once mixed together, pour in 6 c of chicken broth and 4 c water.  Bring the soup to a boil.  Once the lentils become tender stir in 2 tsp red wine vinegar. 


Lower the heat a bit to allow the soup to thicken.  Time to make our croutons.  In a large skillet over high heat, add 3 tbsp of olive oil to coat the bottom of the pan.  Add 2 cloves of crush garlic and let it cook until it sizzles.


Add cubed bread and stir occasionally until golden brown.


Serve your soup with a few croutons on top to create great texture and a delicious addition to your soup!


Saturday, September 24, 2011

Pumpkin Pie Bread with Graham Cracker Crunch Topping

Pumpkin Pie Bread with Graham Cracker Crunch Topping

We have continued to have 100+ degree weather days this late into September.  I absolutely love the holidays and the cool weather that comes with them, so as you can probably imagine, the heat is killing me and my spirits!  Today just might be in the high 80's so there is hope!!  

I decided to make a new bread with pumpkin yesterday to lift my spirits as the boys watched ELF- which is a  movie that is watched year round in our house.  With anything that is attempted for the first time, you never know what you will get.  Turns out that this bread took a LONG time to bake because I used so much topping that it actually baked into the bread like a filling.  Not the most attractive bread I have made, but the flavor definitely didn't lack SO that is why I had to share the recipe.

For the bread, preheat your oven to 350 degrees and prepare 2 loaf pans.  Sift together 3 1/2 c flour, 2 tsp baking soda, 1 tsp baking powder, and 3 tsp pumpkin pie spice.  Set aside.

In a large bowl, beat together 3 c sugar, 1 c oil, 4 eggs, and 1 15 ounce can of pumpkin puree.  Stir in the flour mixture alternating with 1/2 c of water.  Divide the batter between the 2 pans and begin baking for 60 minutes.

Now if you want to simply enjoy the bread without a topping, 60 minutes should be plenty of time to bake.  If you want to create a topping, lower your baking temp to 300 for about 90 minutes, using foil to cover your topping about half way through the baking time.

For the topping, I mixed together 6 crushed graham crackers, 3/4 c brown sugar and 3/8 tsp cinnamon.  Combine 6 tbsp melted butter with 3 tsp vanilla and pour over your graham cracker mixture.  Use a pastry cutter to mix all the ingredients together.  

About 10 minutes into baking my bread, I topped the bread with this topping and allowed the bread to finish baking.  1/3 of the topping will seep into the center of the bread as it bakes, causing the bake time to be lengthened to 90 minutes.  1/3 will stay on top of the bread to create a yummy caramelized crunch (which is why you need to cover the topping with foil half way through so it doesn't burn), and another 1/3 will drip down the sides of your pan which makes it fun to nibble on while you wait for your bread to cool.

Let it cool and slice.  A bite of this bread will put your right in the mood for Fall!!


Tuesday, September 13, 2011

Chopped Vegetable Lasagna

Chopped Vegetable Lasagna

Last night I was looking for a dinner that wouldn't take too long to prepare, but would be full of flavor- I settled on lasagna.  I had a few different cheeses and vegetables to work with so I got busy.

In a large pot I warmed olive oil over the stove and added about a cup each of chopped onions, chopped celery and chopped carrots.  To add flavor to the sauteed vegetables I added a tbsp of minced garlic, a few dashes of pepper, a tsp of red pepper and let the vegetables cook until they were soft.  I then added a can of tomato sauce, 1 1/2 c of chicken stock, a cup of red wine and 2 tbsp of parsley, stirring together and let cook on a medium simmer.  After all my flavors were well incorporated, I removed the sauce from the stove and coated a 9 x 13 pan with just enough sauce to cover the bottom of the pan.


I am a huge fan of Trader Joe's no boil lasagna noodles as they take away the boiling step- I covered my sauce with a single layer of noodles ...


then I added more sauce, followed by ricotta cheese in heaping spoonfuls over the second layer of sauce.


Repeat by topping your cheese with more noodles and sauce.  I love provolone cheese, so I added a layer of provolone to the top of my third level of noodles and sauce.


Finish by layering the noodles and sauce again. 


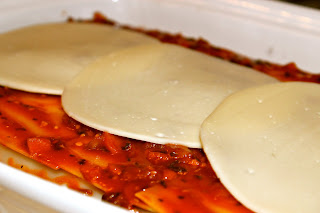
To have a bit of melted cheese on my baked dish, I added 3 more slices of provolone to the top.


Bake at 350 degrees for 40 minutes.  Let cool and serve.  
The chopped vegetables will give great added texture and flavor to your traditional cheesy lasagna!! Enjoy!


Wednesday, September 7, 2011

Cheesy Scalloped Potatoes with Buttered Leek Chicken

Cheesy Scalloped Potatoes


Scalloped potatoes are a huge hit in our home, but I have never taken the time to make them from scratch until today.  Today was a low key day so while the boys were playing and doing workbooks beside me I decided to take advantage of getting dinner started early, refrigerate it and heat about an hour before dinner.  

I had bought a bag of russet potatoes with high hopes of making potato soup ... considering the temperature has remained over 100 degrees every day that wasn't an option- so instead, scalloped potatoes it would be. 

Wash, peel and thinly slice your potatoes (5 or 6) and set aside.  


Over medium heat, melt 4 tbsp butter and saute one onion that has been peeled and sliced until the onion has softened.


In a large measuring cup combine 1 cup of fat free half and half with 1 cup of milk, stir to mix together.


I sprayed a 9x13 dish with oil and coated the bottom with a little of the cream mixture.  Cover the bottom of the dish with 1/3 c of potatoes, sprinkling them with some pepper, a dash of salt, and a pinch of nutmeg.  Layer half of the sauteed onions as well.   


Top with 1 cup of cheese of your choice (I used cheddar and jack) and with 1/3 of the cream mixture.  


Repeat these steps.  Top with the remaining potatoes, cheese and cream mixture.  Season with pepper.  Thinly slice 1 tbsp of butter into small pieces and evenly distribute over the top.  


I covered the potatoes and placed them in the refrigerator until an hour before dinner.  When ready to serve remove from refrigerator and let sit for about 10 minutes before cooking.  Preheat your oven to 375 degrees and cook for 50 minutes until the top is golden and the cream is bubbling.  The potatoes will be tender when tested.  Let rest for 15 minutes before serving.

Buttered Leek Chicken


After having my side dish complete, I needed to get started on the main dish.  I took inventory of my ingredients and decided to use a few stalks of leek I had.  I sliced and washed them- and let them caramelize on the stove with a few tbsp of butter.


I wanted to allow all the flavors to play off one another and marinate throughout the afternoon so I cranked our AC and plugged in the crock pot.  I placed 3 chicken breasts in the crock pot with about 4 tbsp of butter, 2 c chicken stock, 1 1/2 tbsp of Trader Joe's 21 seasoning salute, 2 tsp of dijon mustard, my caramelized leeks (2 stalks in all), and a handful of parsley.


After looking at what I had put together I added about 1/3 c fat free half and half to give the sauce a creamier texture.  


Let cook on low for 6 hours or on high for 4 hours.  The sauce will thicken and be a wonderful topper to your chicken along side your cheesy scalloped potatoes.  A yummy, hearty and flavorful meal!